Burning an SD Card for a Raspberry Pi Using Windows
Step 1: Download your Disk Image
First you need to download the operating system. This tutorial utilizes Raspbian, a Debian-based flavor of Linux specifically designed for the Raspberry Pi, but the same steps can be used to install any operating system that will work with the Pi's hardware.
You can download the Raspbian disk image from raspberrypi.org. Select "Raspbian with Desktop" if you are looking for a graphical interface (GUI) somewhat similar to Windows. If you are new to Linux, or don't know what you need then I suggest starting with the desktop version.
If you are comfortable using the Linux command line, you may find you only need a Linux terminal for many projects, in which case you can use the "Raspbian Lite" disk image.
Here is the link to the download page:
https://www.raspberrypi.org/downloads/raspbian/
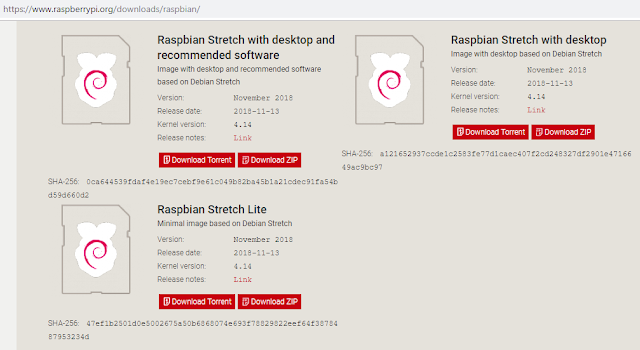
Step 2: Verify your Disk Image
Next you will need to verify your downloaded disk image using the SHA-256 checksum. This will ensure that your download is free from errors, and that no one has tampered with the file. Don't worry, this is a quick and easy process.
If you don't already have checksum software installed on your computer, I recommend Raymond Lin's MD5 & SHA-1 Checksum Utility. It's freeware, and can be downloaded from cnet.com here:
https://download.cnet.com/MD5-SHA-Checksum-Utility/3000-2092_4-10911445.html
or from Raymond's Wordpress blog here:
The freeware version is completely adequate.
Simply run the executable, and browse to your newly downloaded Raspbian image with it's .zip extension (which should be in your Downloads folder if you haven't moved it). Uncheck the boxes next to all the hash functions except SHA-256, and click "Verify".
Verify that the hash generated by the checksum utility matches the SHA-256 checksum provided on the Raspbian Download Page. If your hashes match, your download is good.

Verify that the hash generated by the checksum utility matches the SHA-256 checksum provided on the Raspbian Download Page. If your hashes match, your download is good.

Step 3: Unzip your Disk Image
Unzipping is an easy task in Windows. Just open your Downloads folder and locate your newly downloaded Raspbian file with the .zip extension. Right click on the file and select "Extract All..."
This will create a new folder inside the Downloads folder that will contain the extracted disk image, which will now have a .img file extension.

Step 4: Burn your Disk Image
The last step is to write the .img disk image to SD card. If you don't have software to do this already installed on you computer, I recommend using Win32 Disk Imager. You can download an installer from Sourceforge here:
Now insert your micro SD card into your computer. If you don't have a slot in your computer you will need a USB adapter. When you insert the card in your computer, take careful note of what letter gets assigned to your micro-SD card. In this case it's D:\.
Install and run Win32 Disk Imager, and select your Raspbian Image file in your Downloads folder.
Now make sure the drive selected under "Device" matches the drive letter assigned to your micro-SD card. THIS IS IMPORTANT! If you select the wrong drive letter you could lose all of the data on any device attached to your computer. Don't accidentally overwrite your external hard-drive!
When you are absolutely sure your have selected the correct device, press the "Write" button.

Now Safely Remove the micro-SD card from your computer, and place it in your Raspberry Pi. Power-up your Pi, and your new Single Board Computer should begin to boot.
If you have a USB-keyboard and mouse, and an HDMI monitor, you can plug them into your Pi and begin using it. If not you might want to check out my tutorial on Headless Setup for the Raspberry Pi.
If you are using Raspbian Lite, you might be interested in this tutorial regarding initial configuration using the built-in raspi-config utility.
Burning an SD Card for a Raspberry Pi Using Linux
Step 1: Download your Disk Image
Just as we did for Windows, the first thing we will need to do is to download the disk image. The instructions will be the same as they were for Windows, so I won't restate them here. If you need additional details please see Step 1 above in the section for Windows. The images for Raspbian can be found here:
https://www.raspberrypi.org/downloads/raspbian/
Step 2: Verify your Disk Image
Once again, you will need to verify your downloaded disk image using the SHA-256 checksum. This will ensure that your download is free from errors, and that no one has tampered with the file. In Linux there is no need to download any additional software for this task, it can be completed directly from the command line using the sha256sum command.
Simply locate your download (most likely in your Downloads directory), and navigate to the directory where it resides. Run the command, and then compare it to the SHA256 checksum provided on the Raspbian download page. If the hashes match then your download is good.
sha256sum 2018-11-13-raspbian-stretch-lite.zip
sha256sum 2018-11-13-raspbian-stretch-lite.zip

Step 3: Unzip your Disk Image
In most modern Linux distributions you can unzip with a right click on the file, but since we're already working in the terminal, let's go ahead and do this the old fashioned way. Simply use the unzip command, which will extract the file into the same directory we are currently working in (in this case it is the Downloads directory).
unzip 2018-11-13-raspbian-stretch-lite.zip

Step 4: Burn your Disk Image
The final step is to write the disk image to the SD card. This can also be easily accomplished from the command line, but great care must be taken to be sure you are writing to the SD card, and not to another device attached to your computer, or even worse, your computer's hard-drive!
To determine the device name of your micro-SD card, run the command lsblk before you insert the card. Then insert the SD card and run lsblk again. The device that appears after you have inserted the card is the name of your SD card. See below for an example:

In the image above you can see that the SD card has been named sdb, and has two partitions named sdb1 and sdb2. You can also see that Ubuntu has already mounted both partitions for me. For this procedure we actually need to unmount these partitions, which we can do using the umount command as shown below.
umount /dev/sdb1
umount /dev/sdb2
Once the partitions are unmounted we can write the disk image to the micro-SD card using the dd command. BE VERY CAREFUL WHEN USING dd! It has been nicknamed "disk destroyer" because of the potential to overwrite entire devices, including your computer's harddrive.
Below you can see the syntax of our dd command. You must preface the command with sudo, which specifies that we want to run the command as root. if= points towards the input file, and should be set equal to your Raspbian image file. of= refers to the output file, and should be set equal to the device name of your SD card, which in this case is sdb. Be VERY careful to use the correct device name, and be sure to use the whole device, not one of the partitions (i.e. sdb, not sdb1 or sdb2).
The rest of the arguments should stay the same, so I won't go into detail about their function, but if you are curious you can read more about the dd command here. The full command for this particular situation is as follows (note: this will differ for you depending on the name of the Raspbian file and the device name of the SD card)
sudo dd if=2018-11-13-raspbian-stretch-lite.img of=/dev/sdb bs=4M conv=fsync

And that's it. We have now created an SD card that can be used as a hard drive for a Raspberry Pi. Simply insert the card, power up the Pi, and we are ready to go.
As I mentioned before, at this point you can either plug a USB keyboard and monitor into the Pi and start working immediately, or you can Set Up Your Pi Headlessly and Connect to it Remotely using SSH.
Once you have logged onto your Pi, your next step is likely going to be the Initial Set-up Using raspi-config.
If you enjoyed this tutorial, please leave a comment below, and most importantly, enjoy your journey learning with the Raspberry Pi.
Have Fun!
No comments:
Post a Comment