Showing posts with label Raspberry Pi. Show all posts

Monday, March 25, 2019

Basic Navigation Using the Linux Command Line

Whether you've begun toying with a Raspberry Pi, switched your desktop over to Linux, or are building your first server, the ability to use the Linux command line can be a useful skill.   The first step is learning how to navigate around your computer, which is what this tutorial will teach you.  Welcome to Linux.

This will be the first in a three part series designed to familiarize you with the basics of using the Linux command line.  In this tutorial I will cover the commands pwd, ls, and cd, as well as introduce you to some basic abbreviations.  Let's get started.


The Directory Tree


A directory is the equivalent of what we call "folders" on a Windows system.  The below image is meant to give you a basic idea of how the Linux directory tree is structured.  It starts in the root directory, which is just represented by a slash, and then branches out in a series of nested directories, meaning each directory typically contains a mix of files and additional directories, which in turn contain their own files and directories.

Every system is different, and this image is not meant to be an all-inclusive description of a full directory tree.  It's just a summary to give you the basic idea of how a file system is structured.  In reality every directory in this diagram will contain additional files and directories, but that would just be too much to draw out.


When you first logon to a Linux system, you will be dropped into the home folder of your user.  For example, if you logged onto the system above with the user hiro, your starting location would be /home/hiro/.  You can follow this path on the image above by starting with the first / which represents the root directory, followed by home/, and finally hiro/.

If you ever need to know exactly where you are in the directory tree, you can use the command pwd, which stands for print working directory.  pwd can be used with no options or arguments, and will display your current location, as shown in the example below.


You can also determine your current location by looking at the command prompt, which is typically in the following format:

<user>@<hostname>:/path-to/current/directory $

If you apply this to the image above, you will see that the user is hiro, the hostname of the system is metaverse, but instead of a path to the current directory, it only shows a ~ (known as a tilde).  This is because, in Linux, the tilde is an abbreviation for the home folder of the current user, so in this case, ~ is equivalent to /home/hiro.

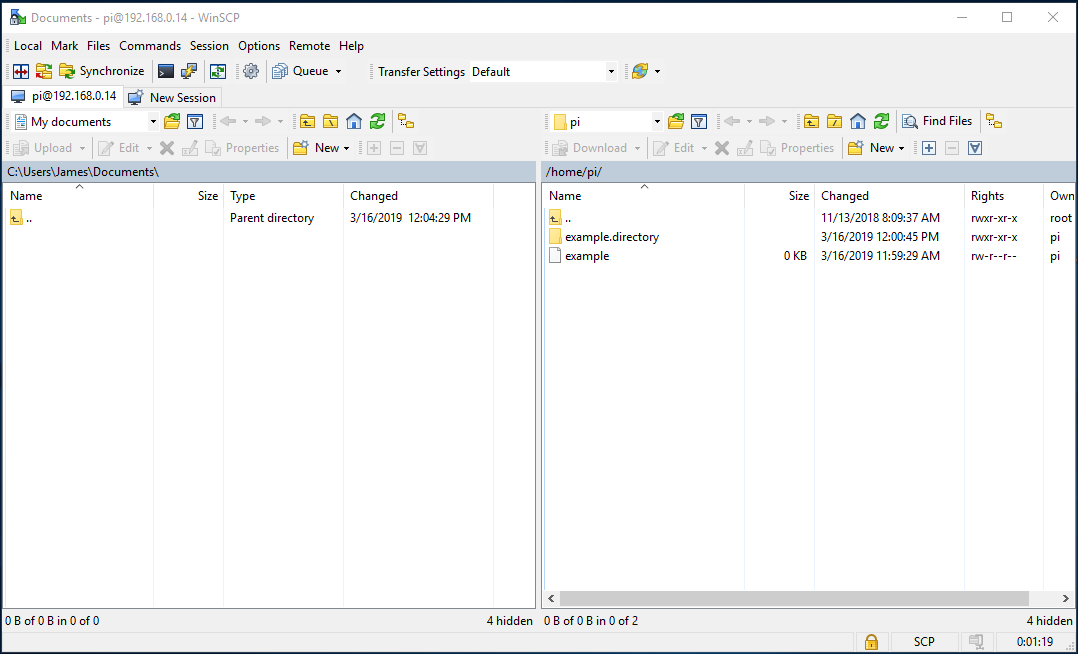
The other command I will cover in this section is ls, which stands for list.  Using ls by itself will list all the non-hidden files and directories located in the current working directory.  So, as the image below will show, if we type ls while we are located in /home/hiro, our terminal will list the one file and three directories contained in our home directory.


How to Change Directories


So now we know where we are and what else is here, let's see how we can move around.  The command cd stands for change directory, and does exactly what you think it does.  Let's say we want to move to the directory /usr/bin, all we need to do is to type cd /usr/local.  In the image below we can tell that we have changed directories because we can see that the prompt has changed.

While we are here we will also try out our commands pwd and ls, just for practice.


Now, let's say we want to get back to our  home directory /home/hiro.  Thanks to some shortcuts there are three ways we can get back there:

cd /home/hiro  - this is the typical way to use cd, utilizing the full path to where we want to go.
cd ~  - as we discussed, ~ is an abbreviation for our home directory, so this will also take us there.
cd  - by itself, cd will always take us back to our home directory.

In the first example above I referred to listing the entire path to the file, starting in the root directory, as the "full path".  I now want to show you how to use some abbreviations that will allow us to refer to the relative path of a file or directory.

As opposed to the "full path", which allows you to navigate to a file or directory regardless of where you are in the directory tree, a "relative path" refers to a file or directory as relative to where you are currently located.  We can do this by using a period to refer to our current location.

For instance, using the directory tree illustrated in the first  image in this tutorial, and assuming that we are in our home directory, both of the following commands would take us to the same place:

cd /home/hiro/scripts/bikes
cd ./scripts/bikes

You can see how this could save us some typing.  When writing scripts or programs it is always better to use the full path to be sure things execute the same no matter where you run them, but when navigating around the file system from the terminal, the relative path is usually the quickest way to get where you are going.

The last abbreviation related to the relative path that I would like to cover in this tutorial is .. (two periods).  Two periods is short hand for the parent directory of your current location - in other words, one step up in the directory tree.

For example, if I was still in the directory /home/hiro/scripts/bikes from the example above, and I wanted to navigate up one level to the /home/hiro/scripts directory, I could use the following command:

cd ..

This can also be used to move sideways.  For example, if I am now in the /home/hiro/scripts directory after the last example, and I wanted to move into the /home/hir/cic directory next to it, I could use the following command:

cd ../cic

The image below is a screen shot of the examples we have just covered in this section.  Pay attention to the prompt to see where we are at in the directory tree.


I know all of this can be a little overwhelming at first glance, but I promise you that with a little practice this will quickly become second nature to you.


So now we know how to show where we are (pwd - print working directory), how to show what is around us (ls - list files and directories), and how to move from place to place (cd - change directory).  We also learned that ~ always  refers to the home directory of the logged-in user, a single period (.) refers to our current working directory, and a double period (..) refers to the parent directory of our current directory.

Before you move on, take some time to navigate around your file system and explore what is there.  Start in your home directory and move up a couple of levels using cd .. until you reach the root directory  Then use ls to see what is there.  Continue exploring by moving down through the directories, listing what is there at each level, and using the relative path to move up and down through the directory tree.  Explore a little.  Have fun!  Below is an example of what I am talking about.


Once you are comfortable navigating around the file system, go ahead and move on to the next tutorial in this series where I will show you how to create, move, copy, and delete files and directories from the Linux command line.

Sunday, March 17, 2019

The Basics of Using the Vim Text Editor

Many of my tutorials or projects talk about creating a file or editing a file, and I rarely go into details on how to do this, so I thought I would write a short tutorial on the basics of using my command-line text editor of choice: Vim.

As a disclaimer, this is a very basic tutorial.  Vim has many powerful features, and I fully intend to gloss over most of them.  In fact, if you are a Vim power user then your face will likely start turning a lovely shade of pink when you see that I tell people that they can navigate around with the arrow keys, but this tutorial is not for you.  It is for the novice that just wants to be able to edit a few config files from the command line or create a short script.

If you would like to know how to use Vim in a more advanced way, simply google "vim tutorial" and you will be presented with a myriad of instructional pages, most of which will go into much more detail than you will find here.  If you are just looking for the basics, then you are in the right place.

Installing Vim


Vim comes preinstalled on many Linux distributions, but not all, and specifically not on Raspbian.  So, if you try to use Vim, and your system informs you that it is not installed, don't worry, installation is quick and painless.

sudo apt-get update
sudo apt-get -y install vim

That's it, if you didn't have Vim before, you have it now.

Using Vim


In order to edit a file the command is simple:

vim <filename>

If the file is write-protected you will need to precede the vim command with sudo.  If the filename indicated does not exist, then Vim will open a blank file with the specified name.

Once the file is open, your terminal will be replaced by the Vim editor in Normal mode (sometimes referred to as Command mode).  Normal mode is mainly used for navigation, and if you opened a file that already contains text you will see that you can navigate around using the arrow keys.

I would be remiss if I didn't point out that you can also use the keys h(left), j(down), k(up), and l(right) to navigate as well, and there are advantages to using them, but if you have a hard time remembering that you can always revert to using the arrows.

There are many other powerful navigation options in Vim such as using w to go the beginning of the next word, or $ to go to the end of the line, but I promised to gloss over all of that, so let's move on.  If you would like to see a summary of the commands available here is a link to a Vim cheat sheet I found by searching for "vim cheat sheet".

The one thing you can't do in Normal mode is to actually edit text, which is the main reason for using a text editor, so let's move on.

Insert Mode


Once you have positioned your cursor where you would like it to be, if you would like to begin entering or deleting text you need to enter Insert Mode.  This can be accomplished by simply pressing i.  When you press i, you will notice that -- INSERT -- appears at the bottom of the terminal.  You will also notice that you can create text by typing, and delete text by using backspace.

When you are finished using Insert mode, you can revert back to Normal mode by pressing [Esc].

The general concept of Vim is that once you finish editing in a particular location you would press [Esc], return to Normal mode, and then use some of Normal mode's more powerful shortcut keys to navigate to the next place you need to edit before returning to Insert mode.  However, in current versions of Vim you can still navigate with the arrow keys while you are in Insert mode.  Purists will tell you this is a bad habit, but don't worry, I won't tell anyone.

Saving and Quitting


If you are doing more than a few quick edits, follow the age-old wisdom and save often.  Anytime you are in Normal mode you can type :w[Enter] to save your progress.  When you are finished working with the file, make sure you have pressed [Esc] to return to Normal mode, and type :wq[Enter] in order to save and exit out of Vim.  If you want to quit without saving your changes you can type :q![Enter] (if you forget the exclamation mark don't worry, Vim will remind you).

Once you have quit you will be returned to your terminal shell in the same condition as when you started the Vim editor.

And that's the quick and dirty rundown of Vim.  As I mentioned before, there is a lot more to learn, but this is enough to allow you to edit config files or write short scripts.  Just remember: i to insert text, [Esc] to get out of Insert mode, arrow keys to navigate around, and :wq to save and quit.

If you enjoy using Vim I encourage you to continue learning and becoming more proficient with the more powerful features available.  Who knows, maybe I'll write a more advanced tutorial myself.  If I haven't placed a link to it here, that hasn't happened yet.

Until next time, Have Fun!

Saturday, March 16, 2019

Headless Set-up of a Raspberry Pi Running Raspbian

A headless machine is one that runs without a monitor and keyboard directly attached for input and output.  Instead it relies on remote connectivity for user interaction with the operating system.

There are many Raspberry Pi projects that don't require direct user interaction with the operating system, such as home automation or monitoring, and for these a headless setup is optimal.  To create and/or alter these systems, one typically uses SSH, or some other remote access protocol.


The difficulty with remote setup, however, is not remote connectivity, but the question of "how do you set-up the Pi for remote connectivity without first having remote connectivity?"  If you have a monitor and keyboard to attach to the Pi then you can do the initial setup locally, but if that is not an option you need a way to enable remote connectivity before first boot.  That is what I will show you how to do in this tutorial.


Enabling Wifi Access Before First Boot


If you have an available Ethernet port and cable, then providing your Raspberry Pi with network access for remote connectivity is as easy as plugging in the cable.  However, if you don't have Ethernet access readily available, or more likely, you are using a Pi without an Ethernet port such as a Raspberry Pi Zero-W, then you need to be able to tell it how to connect to Wifi before you actually have access to it.  Here's how to do it.

Once you have burned the operating system on the SD card (see this tutorial on writing the disk image to the SD card), you will need to create a file on the card named wpa_supplicant.conf.

To create the file in Windows, you can simply use Notepad.  To create the file in Linux you can use a graphical text editor, or you can just use a text editor from the command line, which is what I prefer.  For a quick introduction on How to Use the Command Line Text Editor Vim, check out this tutorial.

The file needs to contain the following information in the following format.  Feel free to copy and paste, but don't forget to change YourSSID to your actual SSID, and YourPassword to the passkey for your Wifi.

country=US
ctrl_interface=DIR=/var/run/wpa_supplicant GROUP=netdev
update_config=1

network={
ssid="YourSSID"
psk="YourPassword"
key_mgmt=WPA-PSK
}

* A couple of quick notes on the contents of this file:  If you are connecting to an unsecured network, then simply omit the line starting with psk, and change the key_mgmt line to look like this: key_mgmt=NONE.  If you are connecting to a network with a hidden SSID, add the following line after the line beginning with ssidscan_ssid=1

Once you have created the file save it as wpa_supplicant.conf.  If you are using Notepad in Windows be sure to put the name of the file in quotes so that it uses the .conf as the file extension instead of appending a .txt to the file and making it a text file.

The file then needs to be copied onto the boot partition of the SD card.  If you are using Windows simply drag and drop the file into the boot partition.


If you are using Linux, first determine the mount point of the boot partition using lsblk.  Then copy the file using the cp command preceded by sudo as shown below.

cp ./wpa_supplicant.conf /media/james/boot/wpa_supplicant.conf


And that's it.  Upon first boot the file you created named wpa_supplicant.conf will overwrite the file /etc/wpa_supplicant/wpa_supplicant.conf on the Linux partition of the SD card, and then the file on the boot partition will be erased.  If you provided the correct information then the Pi will automatically connect to the Wifi network you specified.

You now have Wifi connectivity, but you still won't be able to remotely log onto your Pi until you enable the SSH server.  Luckily there is a quick and easy way to do that as well.

Enabling the SSH Server Before First Boot


In order to enable the SSH server before logging onto your Pi for the first time you must once again place a file on the boot partition, but this time the contents of the file are irrelevant, the only requirement is that it be named ssh.

If you are using Windows, open a new blank document in Notepad, and then save it as "ssh".  Be sure to include the quotation marks so that Notepad doesn't automatically add the .txt file extension.  Just as you did above, drag and drop the newly created file into the boot partition of the SD card.

If you are using Linux you can create the file using the touch command.  Just like you did above, you can use the lsblk command to determine where the boot partition is mounted.  Then navigate there using cd and create the file using touch like so:

cd /media/james/boot
touch ssh

And that's it.  Upon first boot the file named ssh on your boot partition will be erased, and the OpenSSH server will be enabled for one time only.  You will then need to permanently enable the SSH server or else the next time you boot you will not have SSH access.  You can use this tutorial to learn how to permanently enable SSH access to the Pi.

If you need help connecting to the Raspberry Pi using SSH, this tutorial will show you how to connect.

Finally, once you have connected, this tutorial will show you how to do some of the initial configuration required for most projects.

If you have any questions, please let me know in the comments and I will do my best to answer them.

Until next time, Have Fun!

Saturday, February 23, 2019

Initial Configuration of Raspbian Lite using "raspi-config"

The first time you logon to a new installation of Raspbian Lite on a Raspberry Pi you have some basic initial configuration that needs to be done.  Luckily the creators of Raspbian have included a handy utility that makes this an easy task.  The utility is named raspi-config, and can be started by preceding the name of the utility with sudo to run it as root.

sudo raspi-config


This command will pull up a menu that can be navigated with the arrow keys, and menu items can be selected with [Enter].


Below are the steps I consider necessary for the initial set-up of the Raspberry Pi.  Other options are available, but will only be used for specific projects, so they won't be covered here.  For additional information regarding menu options not covered in this tutorial, take a look at the Official Documentation at raspberrypi.org.

Step 1: Change your Password


If your Raspberry Pi might ever be connected to a network, it is very important to change your password from the default for security reasons.  Even it if will not be connected to a network, it is still good practice, and will only take a moment.

Simply select option 1 on the raspi-config main menu, and you will be prompted to enter your new password.  It will ask you to enter the password a second time to confirm, and that's it!  You have updated your password, and your Pi is more secure.

Step 2: Network Options


Selecting option 2 from the main menu will take you to the Network Options sub-menu, which you can see below.


The first thing you will want to do here is to change your hostname.  Much like the password, while this is not absolutely required, it is highly recommended, and overall good practice.  The hostname will help identify your Pi on the network, allowing you to remotely logon without having to know the IP address.  In addition, when working on a network with multiple remote servers, it is convenient to have a reminer which machine you are accessing.

I like to think of changing the hostname as naming my Pi.  It can be fun to give the Pi it's own identity.

The second item under Network Options is Wifi.  This should be fairly self-explanatory.  If you would like to have your Pi connect to a wireless network, and have not already set it up through the Headless Set-up Procedure, this is where you can enter the SSID and Wifi password.

The first thing you will be asked is which country you are in.  If you do not want to scroll through the entire list to find you country, you can type the first letter of the country name, and you will automatically jump to that point in the list.

Next you will be asked for the SSID, where you will need to manually type in the SSID, or name, of the Wifi network.  Finally you will be asked for you password.  If you don't want your Pi to connect to a wireless network you can skip this step.

When you are finished with the Network Options sub-menu, select <Back> to return to the raspi-config main menu.

Step 3: Localization Options


By default, the Raspberry Pi will assume you are in Great Britain.  If you are not located in Great Britain you will need to tell the Pi where you are in the world.  You can do this by selecting option 4, Localization Options, from the main raspbi-config menu.  You will then be presented with the sub-menu pictured below.


The first optin, I1-Change Locale, will present you with a list of locales. You must first scroll down the menu to find the Great Britain locale, shown as en_GB.UTF-8 UTF-8.  It will be selected with an asterisk, and you must deselect it using the [space bar].  This will remove the asterisk.


You can then continue to scroll through the list to find your own locale.  If you are in the United States you will want to select en_US.UTF-8 UTF-8.  When you have selected your locale with the [space bar] and the asterisk has reappeared, you will need to press [Enter] to continue.

You will then be asked to select the "Default locale for the system environment".  If you are in the US select en_US.UTF-8 by highlighting it with the arrow keys and pressing [Enter].  This concludes this section, and will bring you back to the main raspi-config menu.  Go back to option 4 to return to the Localization sub-menu.

Next you will want to select option I2-Change Timezone.  Simply select your region from the first list, and then select your timezone from the second list.  You will then be returned to the main raspbi-config menu again, but we are not quite done with the Localization Options, so again go back to option 4 to return to the Localization sub-menu.

The last thing we need to do is to select I3-Change Keyboard Layout.  Unless you have a specific keyboard layout you would like to use, select "Generic 105-key (Intl) PC" from the list and press [Enter].  It will then take you to a list entitled Keyboard Layout where all the options are for the UK.  If you are not in the UK, select "other" from this list.

You will then be taken to a list to select your Country of Origin.  If you select "English (US)" you will be presented with yet another list.  If you do not know which layout to select from this list, use the first option: "English (US)" with nothing following it.

This will be followed by even more lists (who knew there were so many keyboard options).  Unless you know specifically which options you want off of these lists, use the following options:

Key to function as AltGr:  <<The default for the keyboard layout>>
Compose key:  <<No compose key>>

When you are finished with Keyboard Layout you will be taken back to the main raspi-config menu, and that's it, you're done with Localization.  If you need to change the Wifi Country you can use option I4 from the Localization sub-menu, but since we just did this under Network Options, there should be no reason to do that here.

Step 4: Interfacing Options


The Interfacing Options sub-menu can be used to turn on various interfaces, such as I2C, UART, or the camera interface.  All of these are optional, and will only be used for specific projects, so I won't cover them here, with one exception, SSH.


If you do not plan on constantly having a keyboard and mouse connected to your Raspberry Pi, you will most likely want to be able to control your Pi over a network using another computer.  The best way to do this is utilizing an SSH connection.  In order to that you need to enable the SSH server on your Pi.  Luckily this is incredibly easy to do.

Simply select option P2-SSH from the Interfacing Options sub-menu.  You will then be asked "Would you like the SSH server to be enabled?", to which you should say "Yes".  That's it, you will now be able to access your Pi remotely.  For instructions on how to do this, check out this tutorial on Remote Access to the Raspberry Pi via SSH.

One more quick note: If you haven't already changed your password to something other than the default, you need to do that now that SSH is enabled.  Otherwise anyone will be able to access your Pi over the network, and you open yourself up to all sorts of malicious activities.  Be safe, and change your password.

Step 5: Expand the File System


There is only one last thing you need to do to complete the initial set-up of your Raspberry Pi: Expand the File System.  This will expand the file system to fill the entire SD card so that you can be sure to have the maximum amount of space available for files.  To do this you will need to select option 7-Advanced Options from the main raspi-config menu.


Under the Advanced Options sub-menu you will want to select option A1-Expand Filesystem.  As soon as you select this, the root partition will be resized, and you  will be presented with a message stating that the filesystem will be enlarged upon the next reboot.  Press enter again and you will be returned to the main raspi-config menu.

And that's it.  Feel free to browse the rest of the menu to see the other options available to you, but at this point you should have completed all the necessary tasks to begin using your Raspberry Pi.  When you are ready select <Finish> at the bottom of the main menu.

Provided you expanded the file system, or some other option that requires a reboot,  you will now be asked if you would like to reboot.  No time like the present, so select <Yes> and wait for the Pi to reboot.

You are now ready to embark on your journey of learning and discovery with the Raspberry Pi.  You can become more familiar with the Linux Command Line.  Learn how to code in Bash script, Python, or any programming language you choose.  Follow tutorials for hundreds of projects, or be creative and design your own.  The sky is the limit.  But most importantly...

Have Fun!

Thursday, February 21, 2019

Enabling the SSH Server on the Raspberry Pi

If you would like to work on your Raspberry Pi from a remote terminal, I find the easiest way to do so is with SSH, or Secure Shell Protocol.  SSH creates a remote terminal over a secure channel, and can even be used to transfer files in conjunction with SCP, or Secure Copy Protocol.

However, in order for SSH or SCP to work, we must first enable an SSH Server.  This tutorial will cover four ways to enable the SSH server on the Raspberry Pi.


Enabling the SSH Server with raspi-config


Perhaps the most common way of enabling an SSH server is by using Raspbian's built-in configuration utility: raspi-config.  In order to utilize this method you will need to have access to your Pi via keyboard and mouse.

Simply precede the command raspi-config with sudo to indicate you would like to run the command as root like so, and you will be presented with a menu that can be navigated using the arrow keys.

sudo raspi-config


Once in the menu, navigate down to option #5: Interfacing Options, and press [Enter].  This will take you to another menu, where SSH is option number #P2.  Again use the arrow keys to select option #P2 and press [Enter].


At this point you will be asked if you would like the SSH server to be enabled, to which you should answer <Yes>.  And that's it, easy peasey.  It will take you back to the main raspi-config menu where you can use the right arrow key to select <Finish>, which will then take you back to the command line.

Enabling the SSH Server from the Command Line


An even easier but less common way to enable the SSH server is directly from the command line using systemctl.  Simply use the following command to enable the SSH server:

sudo systemctl enable ssh

if you would like the SSH server to only run for the current session, and then default back to inactive after reboot, you can use the following command:

sudo systemctl start ssh


Enabling the SSH Server Headlessly with Linux


If you don't have a keyboard and monitor to access your Raspberry Pi, then you have a paradox: how to enable remote access without first having remote access.  Luckily the authors or Raspbian have a solution for you.

Once you create the SD card, but before you insert it into your Pi, you need to add a file named SSH (with no file extension) to the boot partition of the SD card.  This will enable the SSH server the next time the Pi boots.  After that the file will be deleted, so the SSH server will not be enabled on any subsequent boots.  Because of this, if you would like to permanently enable the SSH server, it is important to use one of the previous methods listed above to permanently enable the SSH server before you reboot your Pi.

To create the file use df -h to determine where the boot partition is mounted.  In the example below, you can see that the boot partition is listed as /dev/sdb1, and is mounted to /media/james/boot.  Simply navigate to the mount point, and create the file using touch ssh.  See the image below for the full procedure.


Enabling the SSH Server Headlessly with Windows


If you want to create a file named SSH in the boot partition of the micro-SD card, you can just as easily do it in Windows as you can with Linux, but there is one thing you have to be careful about.  Windows likes to automatically add file extensions, which will cause this procedure to fail.  If you simply create a file named ssh in notepad, it will look like the file is only named ssh on your screen, but in reality it will be named ssh.txt.

Luckily there is a simple way to get around this problem.  Simply open Notepad and click Save As.  Name the file "ssh" including the quotation marks, which will create the file with no extension.  Once you have created the file, simply insert the SD card and drag-and-drop the ssh file into your boot partition.

As mentioned before, don't forget that this will only enable the SSH server on the initial boot, so remember to permanently enable the SSH server using one of the other methods mentioned above.

If you also need instructions on how to configure Wifi headlessly using Windows or Linux, this tutorial can help you out.

Have Fun!

Wednesday, February 20, 2019

Transferring Files with SCP

Transferring files over an  SSH (Secure Shell) connection using SCP is easy to do, and can be useful whether you are working on a Raspberry Pi, or just transferring files to or from a Linux computer or server.  For the purposes of this post I will be using a Raspberry Pi, but keep in mind that the same commands can be used for any remote Linux machine.

SCP stands for Secure Copy Protocol, and can be used to securely transfer files between computers.  SCP is based on SSH, and while you don't need to establish a separate SSH session to use SCP, you will need to have an SSH server running on the remote machine.

If you are following along with this tutorial using a Raspberry Pi and do not know how to start an SSH server on your Pi, take a look at this tutorial on Enabling an SSH Server on the Raspberry Pi.

Below I will show you how to transfer files from a Linux Server using both a Linux client and a Windows client.  Let's get started.

Using SCP with a Linux Client and Linux Server


SCP can be used to send files as well as download files, and can be initiated from either the client side or the server side.  In this tutorial I will show you all four examples, but no matter if you're sending or receiving, the basic SCP command is the same:

scp [source file] [target file]

For the command above, [source file] is the location and name of the file you would like to copy from, and [target file] is the location and name of the file you would like to copy to.  It's really that simple.  Keep in mind that location on the computer you are working on only needs to refer to the directory, while location on a remote machine needs to include an IP address or hostname that identifies that computer on the network, followed by a colon (:).

Also, when referring to the remote machine, you will need to precede the IP address or hostname of the computer with "user@".  For example, when connecting to a server with the hostname raspberrypi and user pi, the computer will be addressed as pi@raspberrypi.local:  If the same machine has an IP address of 192.168.4.12 then we could also address it as pi@192.168.4.12:  This should become clear in the examples below.


For the following examples I will be using a Linux desktop running Ubuntu 16.04 LTS with a hostname of jameswork as the client machine, and a Raspberry Pi with a hostname of raspberrypi running Raspbian Lite (Stretch 9.4) as the server machine, which has an IP address of 192.168.4.12.  The same commands should work for most computers running Linux.

I have created files named james-temp1, james-temp2, and james-temp3 in the directory /tmp/example/ on jameswork, and I have created files named pi-temp1 and pi-temp2 in the directory /tmp/files/ on raspberrypi.

I am starting off in the terminal of the client machine jameswork, and I am going to use SCP to send the file james-temp1, which is located in the directory /tmp/example/, to the directory /tmp/files/ on the server machine raspberrypi.

scp /tmp/example/james-temp1 pi@192.168.4.12:/tmp/files/james-temp1

I am now going to do the same thing with the file james-temp2, but this time I will use the hostname instead of the IP address to show you that they work in the same manner.

scp /tmp/example/james-temp2 pi@raspberrypi.local:/tmp/files/james-temp2

I now want to download the file pi-temp1 from the server machine back to the client machine, so I will use the following command where I instead list the remote machine first.

scp pi@raspberrypi.local:/tmp/files/pi-temp1 /tmp/example/pi-temp1

And as we can see in the example my local directory /tmp/example/ now contains the file pi-temp1, as well as the original files james-temp1, james-temp2, and james-temp3.

I will now begin an SSH session with the server machine and show you how the same thing can be done from the server side.  You can tell we are working on the server when the prompt changes from jameswork: to raspberrypi:  If you are not familiar with how to create an SSH session, you may want to visit this tutorial on gaining Remote Access to the Raspberry Pi Using SSH.

Once on the Pi we can see that the files we sent to that machine, james-temp1 and james-temp2, are now located in the /tmp/files/ directory.  The image below is our tutorial up to this point.  All lines that begin with a # are comments, and are not executed.


Now that we are operating on the server side, we need to remember to specify our local client machine as the remote host, because even though we are physically typing on our client computer, it will be the server computer receiving the command.

To tell the Raspberry Pi server to send the file pi-temp2 back to the client machine we can use the following command.

scp /tmp/files/pi-temp2 james@jameswork.local:/tmp/example/pi-temp2

And we can also request that the client machine jameswork send the file james-temp3 to the server with the following command.

scp james@jameswork.local:/tmp/example/james-temp3 /tmp/files/james-temp3

One last thing I would like to show you is that the copied file does not need to have the same name as the original file.  The following command is similar to the previous one where we asked jameswork to send the file james-temp3 to the server raspberrypi, but this time we will rename it james-temp4.

scp james@jameswork.local:/tmp/example/james-temp3 /tmp/files/james-temp4

And as we can see when we list the files in the /tmp/files/ directory, we have now added files named james-temp3 and james-temp4.

If we logout of our SSH session with the server and go back to the client machine, we can now see that the file pi-temp2 has been added to the directory /tmp/example/.

The image below is the second half of the tutorial narrated above.  Any line that begins with a # is just a comment, and is not executed.


Using SCP with a Windows Client and Linux Server


Unlike Linux, Windows does not have a built-in SCP utility for transferring files.  Luckily there is free software available to assist us in this process.  WinSCP is an incredibly useful piece of software that can transfer files using multiple different protocols, including SCP.  You can download the installer from the following website:

Once you have downloaded and installed WinSCP, go ahead and run the program.  You will be presented with the following graphical interface.


As I have done in the picture above, select SCP from the drop-down menu, and type in the IP address or hostname of the server to which you are connecting (for this example it is 192.168.0.14).  The default port for SSH, and thus SCP, is 22, so unless you have changed it for some reason leave it set to port 22.  Finally type in the username and password you will be using to log into the server.  When you are done click [Login].

If this is the first time you have connected to this server you will be presented with a dialog box asking if you want to "continue connecting to an unknown server and add its host key to a cashe". Simply click [Yes].

Once you are logged on you will be presented with the following screen which displays your local machine on the left and the remote server on the right.  You can navigate around your local machine to choose the folder to which you would like to copy.  You can then navigate around the server to find the files that you would like to copy.  As you can see in the example below I have created a file named example, and a directory named example.directory in the home directory of the server.


In order to copy files or directories all you need to do is drag-and-drop them from the window on the right to the window on the left.  It's that easy.


As you can see in the example above, I have now transferred the file example and the directory example.directory from the server to my client machine, and they now exist in my Documents folder.

And that's all there is to it.  Now you know how to copy files and directories to and from a Linux server using both a Windows client and a Linux client.

If you have any questions, please feel free to ask below in the comment section and I will do my best to answer them.

Until next time, Have Fun!

Remote Access to the Raspberry Pi via SSH

You can access the Raspberry Pi from a remote computer using the SSH protocol (aka Secure Shell).  This provides for secure, encrypted communication, terminal access, and file transfer between your remote machine and the Pi.

Before you can access the Pi via SSH, you will need to enable the SSH server on the Raspberry Pi.  To learn how to enable the SSH server on a Raspberry Pi, please see this tutorial.

You will also need to know the username and password to log into the Pi.  By default the username is pi, and the password is raspberry, but if you are going to enable SSH access to the Pi, you should really change the password to something other than the default.

Accessing the Raspberry Pi via SSH from Linux


You can easily initiate an SSH session to the Pi from the Linux command line using the ssh command.  If you know the IP address of the Pi, the command would look something like this, where the argument following the -l option is the username for the Pi, and 192.168.4.24 is the IP address for this particular Pi:

ssh -l pi 192.168.4.24


In the example above, you can see that we are prompted to verify a key from the Pi.  This will only happen the first time you login to the Pi from any given computer.  This is done for security purposes, but is beyond the scope of this tutorial.  For now, just type yes.

You may also notice that the Raspberry Pi warns the user that the default password has not been changed.  This can allow unauthorized users to access you Pi, and should be remedied as soon as possible.  In my tutorial on the Initial Setup of the Raspberry Pi Using raspi-config, the first thing I cover is changing the default password.

You will know that you have successfully logged onto the Pi when your prompt no longer begins with your username@hostname of your Linux computer, and instead you are presented with:

pi@raspberrypi:~ $


Using the Hostname Instead of the IP Address


If you don't know the IP address of your Pi, which will often occur when you setup the Pi headlessly, you can also access the pi using it's hostname followed by ".local".  By default, the host name is raspberrypi, so if you haven't changed the hostname the command would look something like this:

ssh -l pi raspberrypi.local


Finally, as often occurs in Linux, there is another commonly used syntax of which you may want to be aware.  Instead of specifying the username by using the -l option, you can also simply precede the IP address or hostname with the username followed by an @.  For instance, the following two commands would do the exact same thing:

ssh -l pi raspberrypi.local

ssh pi@raspberrypi.local


When you are done working on your Pi, simply type logout to end your SSH session and return to your Linux terminal.

Access the Raspberry Pi via SSH from Windows


If you are using a computer running Windows, you will need to install software to run an SSH client.  I recommend PuTTY, which you can download from the following site:

Once you have installed PuTTY, starting an SSH session is relatively straight forward.  Simply input the IP address (in this case 192.168.4.24) or the hostname (raspberrypi.local by default).  The "Port" will be set to 22 and "Connection type" will be set to SSH automatically, which are the correct settings for a typical SSH session.  The only thing left to do is click Open.


Just as when we first SSHed into the Raspberry Pi from our Linux computer, Putty will ask us to verify that we are sure we are logging into the correct machine by presenting us with the Pi's SSH key.  I will discuss this further in a future tutorial, but at this point just click Yes.


And once again we will know that we are logged onto the Pi when we are presented with the following prompt:

pi@raspberrypi:~ $

Note, this prompt is in the format user@hostname: so if you change the hostname or login using a different user, then your prompt will change accordingly.


When you are done with your SSH session, simply type logout to logout of your Raspberry Pi and close PuTTY.

Now that you know how to login to your Pi remotely, if you would like to learn how to navigate around from the command prompt, take a look at my tutorial on Navigating in Linux from the Command Prompt.

If you don't know how to edit files, you might be interested in my tutorial on File Editing Basics Using Vim.

To learn how to copy files over SSH, check out my tutorial on SCP.

Have Fun!

Sunday, February 17, 2019

Burning an SD Card for a Raspberry Pi Using Windows or Linux

The Raspberry Pi uses a micro-SD card as its hard drive.  I prefer to use a class 10 card with a minimum of 16 Gigabytes, although slower cards with as little as 8GB will suffice (4GB minimum for Raspbian Lite).  The first step in setting up a Raspberry Pi is to burn the operating system disk image to the SD card.  Below I will outline how to do this simple procedure using either Windows or Linux.


Burning an SD Card for a Raspberry Pi Using Windows


 Step 1: Download your Disk Image


First you need to download the operating system.  This tutorial utilizes Raspbian, a Debian-based flavor of Linux specifically designed for the Raspberry Pi, but the same steps can be used to install any operating system that will work with the Pi's hardware.

You can download the Raspbian disk image from raspberrypi.org.  Select "Raspbian with Desktop" if you are looking for a graphical interface (GUI) somewhat similar to Windows.  If you are new to Linux, or don't know what you need then I suggest starting with the desktop version.

If you are comfortable using the Linux command line, you may find you only need a Linux terminal for many projects, in which case you can use the "Raspbian Lite" disk image.

Here is the link to the download page:
https://www.raspberrypi.org/downloads/raspbian/

Raspbian download page


Step 2: Verify your Disk Image


Next you will need to verify your downloaded disk image using the SHA-256 checksum.  This will ensure that your download is free from errors, and that no one has tampered with the file.  Don't worry, this is a quick and easy process.

If you don't already have checksum software installed on your computer, I recommend Raymond Lin's MD5 & SHA-1 Checksum Utility.  It's freeware, and can be downloaded from cnet.com here:
https://download.cnet.com/MD5-SHA-Checksum-Utility/3000-2092_4-10911445.html

or from Raymond's Wordpress blog here:
The freeware version is completely adequate.

Simply run the executable, and browse to your newly downloaded Raspbian image with it's .zip extension (which should be in your Downloads folder if you haven't moved it).  Uncheck the boxes next to all the hash functions except SHA-256, and click "Verify".

Verify that the hash generated by the checksum utility matches the SHA-256 checksum provided on the Raspbian Download Page.  If your hashes match, your download is good.


Step 3: Unzip your Disk Image


Unzipping is an easy task in Windows.  Just open your Downloads folder and locate your newly downloaded Raspbian file with the .zip extension. Right click on the file and select "Extract All..."

This will create a new folder inside the Downloads folder that will contain the extracted disk image, which will now have a .img file extension.


Step 4: Burn your Disk Image


The last step is to write the .img disk image to SD card.  If you don't have software to do this already installed on you computer, I recommend using Win32 Disk Imager.  You can download an installer from Sourceforge here:

Now insert your micro SD card into your computer.  If you don't have a slot in your computer you will need a USB adapter.  When you insert the card in your computer, take careful note of what letter gets assigned to your micro-SD card.  In this case it's D:\.

Install and run Win32 Disk Imager, and select your Raspbian Image file in your Downloads folder.

Now make sure the drive selected under "Device" matches the drive letter assigned to your micro-SD card.  THIS IS IMPORTANT!  If you select the wrong drive letter you could lose all of the data on any device attached to your computer.  Don't accidentally overwrite your external hard-drive!

When you are absolutely sure your have selected the correct device, press the "Write" button.


Now Safely Remove the micro-SD card from your computer, and place it in your Raspberry Pi.  Power-up your Pi, and your new Single Board Computer should begin to boot.

If you have a USB-keyboard and mouse, and an HDMI monitor, you can plug them into your Pi and begin using it.  If not you might want to check out my tutorial on Headless Setup for the Raspberry Pi.

If you are using Raspbian Lite, you might be interested in this tutorial regarding initial configuration using the built-in raspi-config utility.


Burning an SD Card for a Raspberry Pi Using Linux


 Step 1: Download your Disk Image


Just as we did for Windows, the first thing we will need to do is to download the disk image.  The instructions will be the same as they were for Windows, so I won't restate them here.  If you need additional details please see Step 1 above in the section for Windows.  The images for Raspbian can be found here:
https://www.raspberrypi.org/downloads/raspbian/


Step 2: Verify your Disk Image


Once again, you will need to verify your downloaded disk image using the SHA-256 checksum.  This will ensure that your download is free from errors, and that no one has tampered with the file.  In Linux there is no need to download any additional software for this task, it can be completed directly from the command line using the sha256sum command.

Simply locate your download (most likely in your Downloads directory), and navigate to the directory where it resides.  Run the command, and then compare it to the SHA256 checksum provided on the Raspbian download page.  If the hashes match then your download is good.

sha256sum 2018-11-13-raspbian-stretch-lite.zip


Step 3: Unzip your Disk Image


In most modern Linux distributions you can unzip with a right click on the file, but since we're already working in the terminal, let's go ahead and do this the old fashioned way.  Simply use the unzip command, which will extract the file into the same directory we are currently working in (in this case it is the Downloads directory).

unzip 2018-11-13-raspbian-stretch-lite.zip


Step 4: Burn your Disk Image


The final step is to write the disk image to the SD card.  This can also be easily accomplished from the command line, but great care must be taken to be sure you are writing to the SD card, and not to another device attached to your computer, or even worse, your computer's hard-drive!

To determine the device name of your micro-SD card, run the command lsblk before you insert the card.  Then insert the SD card and run lsblk again.  The device that appears after you have inserted the card is the name of your SD card.  See below for an example:


In the image above you can see that the SD card has been named sdb, and has two partitions named sdb1 and sdb2.  You can also see that Ubuntu has already mounted both partitions for me.  For this procedure we actually need to unmount these partitions, which we can do using the umount command as shown below.

umount /dev/sdb1
umount /dev/sdb2

Once the partitions are unmounted we can write the disk image to the micro-SD card using the dd command.  BE VERY CAREFUL WHEN USING dd!  It has been nicknamed "disk destroyer" because of the potential to overwrite entire devices, including your computer's harddrive.

Below you can see the syntax of our dd command.  You must preface the command with sudo, which specifies that we want to run the command as root.  if= points towards the input file, and should be set equal to your Raspbian image file.  of= refers to the output file, and should be set equal to the device name of your SD card, which in this case is sdb.  Be VERY careful to use the correct device name, and be sure to use the whole device, not one of the partitions (i.e. sdb, not sdb1 or sdb2).

The rest of the arguments should stay the same, so I won't go into detail about their function, but if you are curious you can read more about the dd command here.  The full command for this particular situation is as follows (note: this will differ for you depending on the name of the Raspbian file and the device name of the SD card)

sudo dd if=2018-11-13-raspbian-stretch-lite.img of=/dev/sdb bs=4M conv=fsync


And that's it.  We have now created an SD card that can be used as a hard drive for a Raspberry Pi.  Simply insert the card, power up the Pi, and we are ready to go.

As I mentioned before, at this point you can either plug a USB keyboard and monitor into the Pi and start working immediately, or you can Set Up Your Pi Headlessly and Connect to it Remotely using SSH.

Once you have logged onto your Pi, your next step is likely going to be the Initial Set-up Using raspi-config.

If you enjoyed this tutorial, please leave a comment below, and most importantly, enjoy your journey learning with the Raspberry Pi.

Have Fun!