SCP stands for Secure Copy Protocol, and can be used to securely transfer files between computers. SCP is based on SSH, and while you don't need to establish a separate SSH session to use SCP, you will need to have an SSH server running on the remote machine.
If you are following along with this tutorial using a Raspberry Pi and do not know how to start an SSH server on your Pi, take a look at this tutorial on Enabling an SSH Server on the Raspberry Pi.
Below I will show you how to transfer files from a Linux Server using both a Linux client and a Windows client. Let's get started.
Using SCP with a Linux Client and Linux Server
SCP can be used to send files as well as download files, and can be initiated from either the client side or the server side. In this tutorial I will show you all four examples, but no matter if you're sending or receiving, the basic SCP command is the same:
scp [source file] [target file]
For the command above, [source file] is the location and name of the file you would like to copy from, and [target file] is the location and name of the file you would like to copy to. It's really that simple. Keep in mind that location on the computer you are working on only needs to refer to the directory, while location on a remote machine needs to include an IP address or hostname that identifies that computer on the network, followed by a colon (:).
Also, when referring to the remote machine, you will need to precede the IP address or hostname of the computer with "user@". For example, when connecting to a server with the hostname raspberrypi and user pi, the computer will be addressed as pi@raspberrypi.local: If the same machine has an IP address of 192.168.4.12 then we could also address it as pi@192.168.4.12: This should become clear in the examples below.
For the following examples I will be using a Linux desktop running Ubuntu 16.04 LTS with a hostname of jameswork as the client machine, and a Raspberry Pi with a hostname of raspberrypi running Raspbian Lite (Stretch 9.4) as the server machine, which has an IP address of 192.168.4.12. The same commands should work for most computers running Linux.
I have created files named james-temp1, james-temp2, and james-temp3 in the directory /tmp/example/ on jameswork, and I have created files named pi-temp1 and pi-temp2 in the directory /tmp/files/ on raspberrypi.
I am starting off in the terminal of the client machine jameswork, and I am going to use SCP to send the file james-temp1, which is located in the directory /tmp/example/, to the directory /tmp/files/ on the server machine raspberrypi.
scp /tmp/example/james-temp1 pi@192.168.4.12:/tmp/files/james-temp1
I am now going to do the same thing with the file james-temp2, but this time I will use the hostname instead of the IP address to show you that they work in the same manner.
scp /tmp/example/james-temp2 pi@raspberrypi.local:/tmp/files/james-temp2
I now want to download the file pi-temp1 from the server machine back to the client machine, so I will use the following command where I instead list the remote machine first.
scp pi@raspberrypi.local:/tmp/files/pi-temp1 /tmp/example/pi-temp1
And as we can see in the example my local directory /tmp/example/ now contains the file pi-temp1, as well as the original files james-temp1, james-temp2, and james-temp3.
I will now begin an SSH session with the server machine and show you how the same thing can be done from the server side. You can tell we are working on the server when the prompt changes from jameswork: to raspberrypi: If you are not familiar with how to create an SSH session, you may want to visit this tutorial on gaining Remote Access to the Raspberry Pi Using SSH.
Once on the Pi we can see that the files we sent to that machine, james-temp1 and james-temp2, are now located in the /tmp/files/ directory. The image below is our tutorial up to this point. All lines that begin with a # are comments, and are not executed.

Now that we are operating on the server side, we need to remember to specify our local client machine as the remote host, because even though we are physically typing on our client computer, it will be the server computer receiving the command.
To tell the Raspberry Pi server to send the file pi-temp2 back to the client machine we can use the following command.
scp /tmp/files/pi-temp2 james@jameswork.local:/tmp/example/pi-temp2
And we can also request that the client machine jameswork send the file james-temp3 to the server with the following command.
scp james@jameswork.local:/tmp/example/james-temp3 /tmp/files/james-temp3
One last thing I would like to show you is that the copied file does not need to have the same name as the original file. The following command is similar to the previous one where we asked jameswork to send the file james-temp3 to the server raspberrypi, but this time we will rename it james-temp4.
scp james@jameswork.local:/tmp/example/james-temp3 /tmp/files/james-temp4
And as we can see when we list the files in the /tmp/files/ directory, we have now added files named james-temp3 and james-temp4.
If we logout of our SSH session with the server and go back to the client machine, we can now see that the file pi-temp2 has been added to the directory /tmp/example/.
The image below is the second half of the tutorial narrated above. Any line that begins with a # is just a comment, and is not executed.

Using SCP with a Windows Client and Linux Server
Unlike Linux, Windows does not have a built-in SCP utility for transferring files. Luckily there is free software available to assist us in this process. WinSCP is an incredibly useful piece of software that can transfer files using multiple different protocols, including SCP. You can download the installer from the following website:
Once you have downloaded and installed WinSCP, go ahead and run the program. You will be presented with the following graphical interface.

As I have done in the picture above, select SCP from the drop-down menu, and type in the IP address or hostname of the server to which you are connecting (for this example it is 192.168.0.14). The default port for SSH, and thus SCP, is 22, so unless you have changed it for some reason leave it set to port 22. Finally type in the username and password you will be using to log into the server. When you are done click [Login].
If this is the first time you have connected to this server you will be presented with a dialog box asking if you want to "continue connecting to an unknown server and add its host key to a cashe". Simply click [Yes].
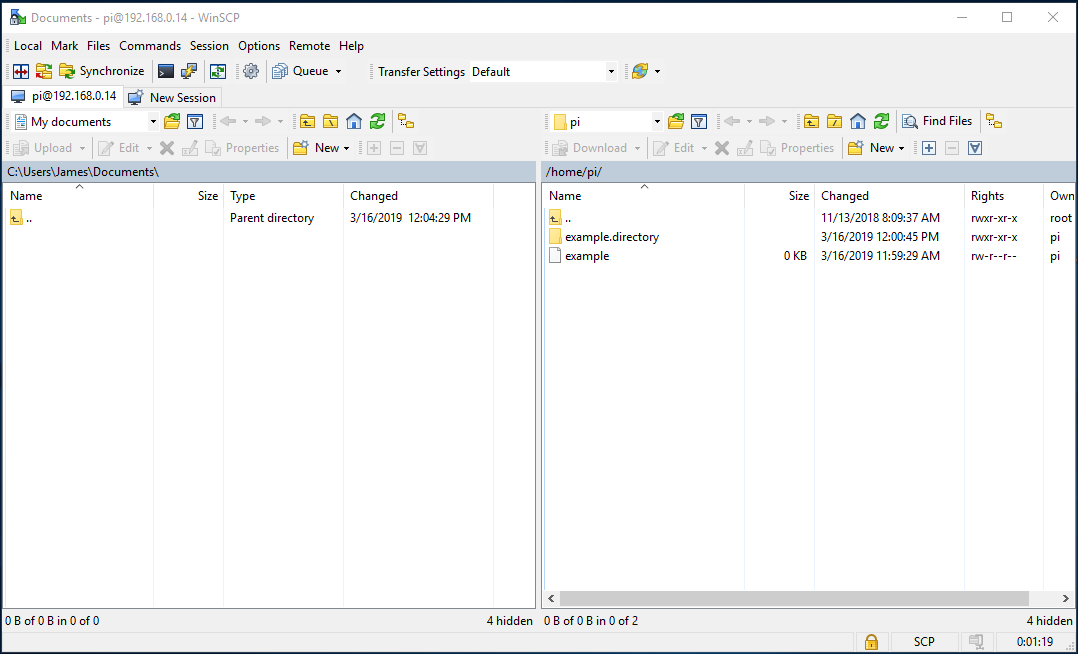
Once you are logged on you will be presented with the following screen which displays your local machine on the left and the remote server on the right. You can navigate around your local machine to choose the folder to which you would like to copy. You can then navigate around the server to find the files that you would like to copy. As you can see in the example below I have created a file named example, and a directory named example.directory in the home directory of the server.
In order to copy files or directories all you need to do is drag-and-drop them from the window on the right to the window on the left. It's that easy.

As you can see in the example above, I have now transferred the file example and the directory example.directory from the server to my client machine, and they now exist in my Documents folder.
And that's all there is to it. Now you know how to copy files and directories to and from a Linux server using both a Windows client and a Linux client.
If you have any questions, please feel free to ask below in the comment section and I will do my best to answer them.
Until next time, Have Fun!
No comments:
Post a Comment